I. Introduction
In this blog post, we will explore the fascinating world of circular knitting machines and learn how to set them up. Circular knitting machines are versatile tools that enable the creation of seamless knitted fabrics in a variety of designs and patterns. Whether you’re a hobbyist or a professional, understanding how to properly set up a circular knitting machine is essential for achieving desired results.
- Circular knitting machines offer several advantages over traditional flatbed knitting machines. They can produce continuous tubes of fabric, making them ideal for creating items like hats, socks, and seamless garments. Circular knitting machines also offer greater efficiency and speed, allowing for faster production. Additionally, the circular knitting technique eliminates the need for time-consuming and challenging stitching or seaming processes. With these advantages, mastering the setup of a circular knitting machine opens up exciting possibilities for knitters of all skill levels.

II. Overview of Circular Knitting Machines
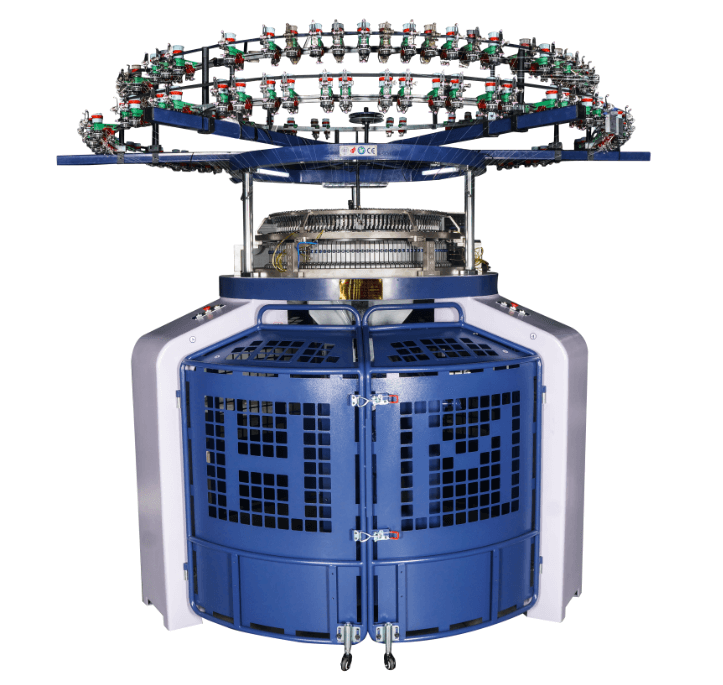
Circular knitting machines operate on the principle of continuous knitting in a circular motion. They consist of a needle bed, which holds the knitting needles, and a rotating cylinder or circular needle bed. As the cylinder rotates, the needles move in a circular motion, creating the knitted fabric. The yarn is fed into the machine and threaded through the needles, allowing for the formation of stitches.
There are various types of circular knitting machines, each with its own unique features and applications.
1. Single-Cylinder Machines: These machines have a single cylinder and are commonly used for knitting smaller tubular items like socks, sleeves, and hats. They are versatile and suitable for a wide range of yarn weights.
2. Double-Cylinder Machines: These machines have two cylinders, one inside the other, and are used for knitting double-layered fabrics or intricate patterns. They are often used for creating complex designs and textures in fabrics like jacquard and ribbed patterns.
3. Circular Flat Machines: These machines combine the features of circular knitting and flat knitting machines. They allow for the production of flat panels that can be seamed together later to create garments or other items.
4. Circular Sinker Machines: These machines use sinker plates in addition to needles, which allows for the knitting of stretchier and more elastic fabrics. They are commonly used for producing items like sportswear, undergarments, and swimwear.
Understanding the different types of circular knitting machines and their applications can help knitters choose the most suitable machine for their projects, ensuring optimal results and efficiency.
III. Preparations
A. Before setting up a circular knitting machine, it’s important to gather the necessary tools and materials. Here are some commonly used items:
1. Circular Knitting Machine: Choose the specific type and model of circular knitting machine that suits your needs.
2. Yarn: Select yarn suitable for your project, considering factors such as fiber content, weight, and color. Make sure to have enough yarn to complete your desired project.
3. Needles: Check the needle requirements for your circular knitting machine. They may come in different sizes and types, such as latch needles or spring needles. Ensure you have the appropriate needles for your chosen machine.
4. Yarn Guide or Tension Device: Some circular knitting machines may require a yarn guide or tension device to ensure consistent tension and smooth knitting. Check if your machine needs one and have it ready.
5. Stitch Markers and Row Counters: These tools can help you keep track of stitches and rows, especially for more complex patterns.
B. Selecting the appropriate yarn and needle sizes is crucial for achieving the desired fabric characteristics and gauge. Consider the following factors:
1. Yarn Weight: Choose a yarn weight that matches your project requirements. Different weights will produce different fabric textures and densities.
2. Needle Size: Consult the manufacturer’s guidelines or machine manual to determine the recommended needle sizes for your chosen yarn weight. Using the correct needle size ensures proper stitch formation and tension.
3. Gauge: Pay attention to the gauge specified in your knitting pattern. Adjust the needle size and tension to achieve the required gauge, which ensures the accurate sizing and fit of your finished item.
4. Experimentation: Feel free to experiment with different yarns and needle sizes to achieve unique textures or designs. However, keep in mind that significant variations may affect the final outcome, so it’s important to make swatches and test for the desired results.
By carefully selecting the tools, materials, yarn, and needle sizes, you’ll set yourself up for success when it comes to knitting on a circular knitting machine.
IV. Setting Up the Circular Knitting Machine
A. Step 1: Assembling the Machine
1. Start by unpacking and organizing all the components of the circular knitting machine according to the manufacturer’s instructions.
2. Carefully follow the manufacturer’s guidelines to assemble the various components of the machine. This may involve attaching the cylinder, securing the needle bed, and connecting any additional accessories.
3. Pay attention to any specific installation precautions mentioned in the manual, such as aligning parts correctly, tightening screws appropriately, and ensuring stability.
B. Step 2: Adjusting the Needle Bed and Needles
1. Install the needle bed onto the machine following the manufacturer’s instructions. Ensure it is securely attached and properly aligned.
2. Depending on your project requirements, select the appropriate needle sizes and types. Attach the needles to the needle bed, making sure they are inserted firmly and evenly spaced.
3. Adjust the needle bed position, if necessary, to ensure smooth rotation and proper clearance between the needles and other machine parts.

C. Step 3: Setting Up the Yarn
1. Begin by attaching the yarn to the yarn carrier or yarn guide, if applicable. Follow the machine’s instructions for properly securing the yarn in place.
2. Guide the yarn through the yarn tensioning device, if present, to help maintain consistent tension throughout the knitting process.
3. Thread the yarn through the first few needles, ensuring it passes behind the latches or through the needle eyes, depending on the needle type. Follow the machine’s threading path or pattern to ensure the yarn is correctly threaded through the needle bed.
4. Continue threading the yarn through the remaining needles, ensuring it moves smoothly and without any tangles or knots.
5. Take extra care to prevent yarn snags or jams by ensuring the yarn is not caught or tangled in any machine parts.
By following these steps, you’ll be able to correctly assemble the circular knitting machine, adjust the needle bed and needles, and set up the yarn for smooth and efficient knitting. Always refer to the manufacturer’s guidelines and instructions specific to your machine for the most accurate setup process.
V. Troubleshooting and Testing
A. Once you’ve set up your circular knitting machine, it’s important to check if everything is set up correctly before starting your project. Here are some key points to consider:
1. Inspect the machine: Carefully examine the assembled machine, ensuring all components are securely attached and in the proper positions. Check for any loose screws, misaligned parts, or potential hazards.
2. Needle alignment: Check that the needles are evenly spaced and properly inserted in the needle bed. Verify that there are no bent or damaged needles. Make any necessary adjustments to ensure the needles move smoothly and without obstruction.
3. Yarn threading: Double-check that the yarn is correctly threaded through the needle bed and needles. Ensure it is properly tensioned and moves freely without snagging or tangling. Pay attention to the correct yarn path specified by the machine’s instructions.
B. Once you’ve confirmed the machine is set up correctly, it’s time to perform some test projects to ensure smooth machine operation. Here’s how:
1. Simple swatch: Start by knitting a small swatch using a basic stitch pattern or plain knitting. This allows you to observe how the machine handles the yarn and produces stitches. Pay attention to the tension, stitch formation, and overall fabric quality.
2. Test different stitch patterns: Experiment with different stitch patterns or techniques to assess the machine’s capabilities. Try ribbing, lace, or jacquard patterns, depending on your machine’s capabilities. Note any challenges or limitations you encounter.
3. Check for any abnormalities: While knitting your test projects, keep an eye out for any irregularities or issues. Watch for dropped stitches, skipped needles, or inconsistent tension. Address any problems by adjusting the machine settings or troubleshooting techniques outlined in the machine’s manual.
4. Evaluate the results: Examine your test projects and assess the fabric’s quality, stitch definition, and overall appearance. If you’re satisfied with the results, it indicates that your circular knitting machine is operating smoothly. If you encounter any issues, consult the troubleshooting section of your machine’s manual or seek assistance from experienced users or manufacturers.
By thoroughly checking the machine setup and conducting test projects, you can ensure that your circular knitting machine is functioning properly and producing the desired results. It’s crucial to address any issues or irregularities before starting larger or more complex projects to achieve the best outcomes.
VI. Conclusion
In conclusion, setting up a circular knitting machine involves several key steps. First, correctly assemble the machine, ensuring all components are securely attached. Next, adjust the needle bed and install the appropriate needles. Finally, properly set up the yarn by threading it through the needle bed and needles. Following these steps ensures a smooth and efficient knitting experience.
The importance of proper machine setup cannot be overstated. It lays the foundation for successful knitting projects, ensuring even tension, proper stitch formation, and desired fabric outcomes. By mastering the setup process, knitters unlock a world of creative opportunities, from seamless garments and accessories to intricate patterns and textures. So take the time to set up your circular knitting machine correctly and embark on a journey of limitless knitting possibilities.
Related Article
Several types of regenerated fibers that are easily confused.
Read moreSeveral types of regenerated fibers that are easily confused.
Key technologies for double-sided circular knitting machine needle plate calibration
Read moreKey technologies for double-sided circular knitting machine needle plate calibration
How a Circular Knitting Machine Releases and Lowers the Fabric (Shake-down Process)
Read moreHow a Circular Knitting Machine Releases and Lowers the Fabric (Shake-down Process)
What is paper-type yarn?
Five fabric components most easily misidentified during testing
Read moreFive fabric components most easily misidentified during testing
